Monday, 30 December 2013

Quilt backing

I had hoped to have finished the Mario quilt for the boy for Christmas but unfortunately it didn't happen! I had the front completed well in time. But the backing proved more tricky! I wanted it to be a bit more interesting than just a plain backing but knew I was limited by time! 

I have taken part in the Blossom Heart Quilts ABC Quilt along making my children's names (something else that needs finishing!). So I used her templates again to make the boy's name for the quilt backing. They had to be square to fit in with the pixelated theme of the front so I changed a couple of the letters to fit in with the look I wanted. I didn't take pictures of them as I was going along! 

But then I realized I hadn't got enough of the Kona aqua to complete the back! So 3 weeks before Christmas I ordered more fabric and sat patiently (not!) watching the days disappear waiting for the package to arrive in my post box. It took far longer to arrive than I anticipated, I guess Christmas post and all that. 

Two days before Christmas I finished piecing together the backing! But, by then, I had to accept that it wasn't going to happen so gave up pushing myself to complete it. 


Now I have the two pieces waiting to to be put together. Soon, hopefully!

Saturday, 7 December 2013

Lovely Year of Finishes - Dec Goal

I seem to have a long list of things I want to finish (or even start and finish!) within the next couple of weeks! So it's hard to pick one for this months goal.

But I have decided that the Mario quilt is the priority! This is supposed to be one of the boy's Christmas presents and I'd rather it didn't become a birthday one instead! 

I spent much of yesterday doing the sashing. None of my blocks seem to have finished at the same size. The margin of error may only be very small on any row or column but overall has meant that they have ended up anywhere between 18.25" and 19". Lots of manipulation going on!! 


Now it is nearly all together, this quilt is looking big! I am struggling for a space to photograph it all! I am going to have to make a backing as I have nothing this large sitting around! And quilt it! Going to be interesting! I see some late nights coming up!

Linking to A Lovely Year of Finishes.

Saturday, 23 November 2013

Pretty Bags

I had some pretty pink and orange flower fabric amongst my stash and a bag pattern that I have wanted to try for a very long time. The pattern is the Two Zip Hipster by Erin Erickson.

The gift is for the littlest one so I didn't want to make it too big or it would get stuffed with far too much and she wouldn't want to carry it! So I measured another child size bag we have and adjusted the pattern slightly. Had I not decided to do this, the pattern would have gone together like a dream! It was only my ability to scale things that hindered me!!


I do have the slight issue of not having slider bit for the strap so at the moment it is attached by a safety pin. I might have to temporarily sew the strap together at the right length until I obtain said slider!

I must say the instructions were so easy to follow and I can't believe I put off making it for so long. It even had two zips which I had no problems doing! Amazing! This went together in just two evenings, which for me is pretty good!!

Whilst I am on the subject of bags I made this market tote a while back for my mum and gave it to her when were at home last. It turned out a bit bigger than I had expected but it was fun to do. This pattern came from a Clover & Violet quilt-a-long tutorial. For this one I used lots of pretty brown fabrics, brown is a colour my mum likes.


This makes me think I really should make myself some pretty grocery bags rather than the very boring supermarket ones that are falling apart! Another thing for the to-do list!

Friday, 22 November 2013

A doctor in the house!

I was quite happily sat knitting late last night. I was trying to get a start on a Christmas gift that, if I am not fast, it will be for next Christmas!


And the conversation with my husband, completely out of the blue, goes something like this:

Husband : "you could make me a bow tie if you like"!
Me: "what? now?"
Husband: "you've got plenty of fabric, right?"
Me: "er… yes"
Husband: "I've got a pattern!"
Me: "ok, but it's 10.30pm!"
Husband: "it looks easy, won't take you long!"

And to be fair it didn't take me too long to make, but wasn't quite what I had in mind at that time of night. I expect my children to drop things like that on me but not necessarily my husband! 

The reason for this unexpected outburst from him (he never asks me to make him anything!) is because Doctor Who is celebrating it's 50th Anniversary. Tomorrow the BBC are showing a special episode and no doubt other things are going on too! The eleventh doctor, incase you don't follow this, wore a bow tie! Hence the sudden request for a bow tie! I am just thankful he didn't go any further and ask for a Fez too! Although I think that would have been rather cool, I liked the Fez!

Anyway, he picked the fabric - snowflakes in red! And then provided me with tea and chocolate to help me along!


We struggled to actually tie the bow tie last night, clearly too late by then for such complicated things! He also commandeered the boy's sonic screwdriver to finish off the act. It did, however, need putting back together first! It had somehow fallen in the toilet recently and been drying out! 

He was not too impressed that I requested a picture of the bow tie being worn before he walked out the door. Now all I want is proof that he wore it all day!


Ever eventful in our house!

Sunday, 17 November 2013

Castle Pillow ** Finish **

If you have arrived here from the Sew Sisters Blogathon Canada - Welcome, thanks for stopping by and hope you enjoy the blog hopping.

I made some great progress this weekend on the castle pillow. I had these gorgeous fabrics from Timeless Treasures called Matilda that I wanted to use on the back.

I have a copy of the Pillow Pop book and love the 'Bunch of Crosses' pattern by Katy Jones. So I set to cutting out lots of strips and 2.5" squares. 

I wanted the back to be an envelope style as I am not keen putting zippers in! I struggled for a while with thinking I would have to have the pluses match up over the overlap. But it made the brain hurt too much so decided I should let it go and not worry about it!


Natalia Bonner in her Free Motion Quilting book has a leaf and loops and a flower and loops design which thought would go well with the fabrics. So I decided to use the leaf design with the odd flower mixed in. I tried to make my leaf look like those on the fabric (or a close as I could get it!).

Leaf and Flower Quilting pattern

About 4 years ago I quilted a quilt with free machined daisies a bit like the one above and I remember having to have the design printed on paper (many times) so I could stitch the design on the paper over the lines to make it look how I wanted! I wasn't brave enough to just free motion quilt! My mum and I then spent a good few hours carefully pealing the paper off the stitching, what a palaver! I am so pleased that I can now, fairly confidently, stitch a daisy without markings but more importantly (to me) not worry about them not all looking the same or perfect! Progress! :)

I bound the edges of the overlap using a normal quilt binding in the lovely orange solid. I would usually hand stitch down the binding to finish it off, but I thought I would use the machine instead. It worked! I am always quite surprised when I try something new and it actually works! 

Although it worked well here, it had (what I consider) quite a large flap on the back that I wasn't so keen on. So I don't think I will make it my regular binding finishing method.

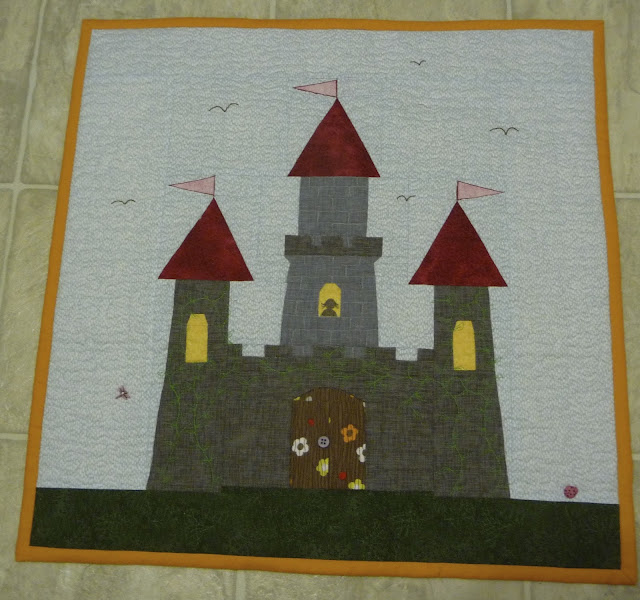
Next I turned my attention back to the front of the cushion. I talked about the making of it here and here. I felt the castle needed some embellishment to brighten it up a little. I started by adding a person into one of the windows and some vines growing up the castle walls.

Castle Details

I added a few birds to the sky using a perlé thread and my eldest daughter had some cute buttons in her sewing supplies - a dragonfly and a ladybird in pink! Prefect! So here we have the finished front:

Finished Castle Pillow Front

Finally, I bound it all using the orange solid, et voila:

Pillow front


Castle Pillow Back

These pictures don't do the much for the colours, that's what comes of finishing things late in the evening and not having good lighting! 

I have just put a cushion pad inside and can see I will have to add a couple of buttons to the back to keep it closed together properly.

I am really pleased with it! My only real concern is that there isn't much pink on this cushion and the littlest one is a very pink person. She saw the backing on the design wall whilst under construction and I asked her what she thought of the fabrics, and she didn't seem overly impressed with them! Perhaps altogether with the castle she will have a different response… So now onto planning the princess party and to making a castle cake! It's all about the castle this year, oh to be 5 again!


Castle Pillow Front

Wednesday, 13 November 2013

WIPing it!

The castle pillow seems to have gone on hold for a minute. I mustn't leave this too long though or I will be rushing it the night before! I am still deciding on the pillow backing! I can't decide on a patchwork design.

So I pulled out an old WIP. One day last week it occurred to me that we are nearly mid-November! I got a little concerned that I hadn't made any progress (since July!) on the Mario quilt for the boy for Christmas! I thought I had better focus on this for a while, so this last week I have made nearly 3 Mario blocks.


Goomba

I thought I was doing so well with Goomba, until I stood back and looked at him from a distance. I noticed I had transposed a couple of lines! Oh, I was not a happy bunny! It meant quite a bit of unpicking, but worse still it meant sewing the lines back together, which is time consuming matching all the seams correctly! But he looked a lot better once put right! 

Turtle Shell

Bob-omb

I am quite thankful that I am done sewing together so many 1.5" squares, some 3888 squares to be exact!! I can't wait to finish off this last block and to lay it out and finally get it sewn together!

Linking up with The Needle and Thread Network and Freshly pieced.

Thursday, 7 November 2013

A Lovely Year of Finishes - Nov Goal

My goal for October was to finish sewing together my hexies. I made slow progress but didn't finish it. Oh well, never mind.


It would help if I focused more on completing the goal I set myself rather than starting other things or getting distracted.

I am going to set a goal this month that I know I will meet and that is because this cushion is for a little girl's birthday in 18 days time. The paper pieced castle is finished and quilted.

princess castle


I want to add some embellishments, thinking maybe some birds and flowers, to finish it off. 

I also need to sort out the backing to the cushion, but I can't make a decision on what it should be. I have some very pretty fabrics by Timeless Treasures called Matilda which is very apt as the little girl's name is Matilda. But I am not sure if to make a patchwork back with a selection of the fabrics or to choose one of them. I suspect time will end up being the deciding factor!


I am also realising that December is not very far away and I had in my mind rather a long list of things I would like to make as gifts. Going to have to focus a bit more if I am going to get half of them done. Off to write a list and try and be realistic!

Wednesday, 30 October 2013

Piecing a castle!

Our littlest one turns five in November. She is still very much the princess fairy little girl and into all things pretty and sparkly! This year I planned to make each child a cushion as a gift. The boy received a Mario one and the eldest a blue themed pattern from Elizabeth Hartman's book Modern Patchwork.


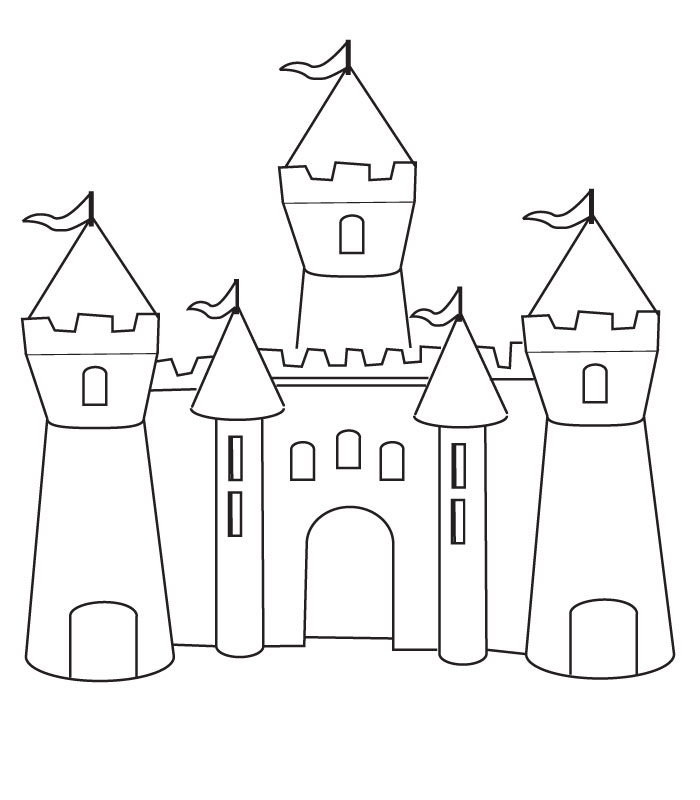
So I set to thinking of a design for the littlest one. I concluded that the only option really was a fairy castle! So I googled for a picture and found this one that I liked.


This would normally say appliqué to me but since I have been doing quite a bit of paper piecing lately I took a different path! That said, I have only ever used other people's patterns and not actually created one myself before. But hey, first time for everything, right?!

So I jumped in feet first and this is the progress I have made.


Im not sure that starting with such a complicated picture as my first paper piecing design was the most sensible idea! But, hey ho! It has been a great challenge and I am certainly learning from my mistakes!

Thankfully I have given myself lots time to do this one and not my usual time frame of completing it on the eve of the birthday! Mind you I shouldn't say that it's not finished yet and time has a funny habit of slipping away very quickly sometimes.


Tuesday, 29 October 2013

Blogger's Quilt Festival Fall 2013

After admiring the quilts entered into previous Blogger's Quilt Festivals I decided this time I would enter one of mine into the Home Machine Quilted category.

Back at the beginning of the year I took part in the Something New Sampler blog hop organised by Amy at 13 Spools. A total of 9 different blocks were presented by 9 different bloggers each using a different technique and putting a modern spin on it. The blocks were also an interesting size being 7" x 14"! Certainly a size and shape I hadn't tried before. 

I picked out my fabric bundle, colours that were also quite different for me, and set to making the blocks. I like taking part in quilt alongs as it keeps me motivated and focused, and I often need the pressure to get things done! 

Some of the blocks went together better than others and there were some that I was not particularly keen on after giving them a go! But it's good to try new things to know they don't suit you. 

Here are the blocks whilst I played around with different layouts.


To finish off this 'new technique' quilt I decided I would experiment with the quilting. I had, until this point, only really used a stippling pattern when free motion quilting as I was usually too scared to try out new patterns for fear of ruining a quilt top. But since each block was quite small I decided they were an ideal size to play with. How much could go wrong in 7" x 14"! This was quite a challenge, but I really enjoyed it.

I quilted each block differently but once I had practiced on the block I took the quilting out to the adjacent plain block to fill out the white space.


Trapunto Block
Scraptastic Block


Bargello
Cathedral Windows
Curve piecing
And the final quilt looked like this:


I loved how this quilt turned out in the end. But my most favourite part of this quilt is the trapunto block and the quilting. This is the back of the quilt block, I just love how the quilting really makes the trapunto stand out and gives it some great texture.


Linking up to Blogger's Quilt Festival by Amy:


AmysCreativeSide

Quilt Stats:
Fabric : 9 dots by Henry Glass, Kona white and a Bella green (can't remember the name!)
Size: 38" x 65"
Started: January 2013
Finished: May 2013

Monday, 7 October 2013

A Lovely Year of Finishes - October

I am spending much of this month in my home town back in the UK visiting family and friends. To reduce the chaos only one of the kids has come with me as it's not really a vacation but more a family visit, but that is a different story. 

I have bought with me a couple of hand sewing projects that have been on going for a while now!! In the hope that I'll get some time to get on with them.

First up, my hexies. I thought this would be an ideal little project at the airport and on the plane. But I was quite tired on the plane (a night flight) and knowing I had a 4 hour drive when we arrived, the sewing didn't even make it out of my bag!!

But now having nearly got used to the time difference (8 hours) I have actually managed to stay awake long enough in the evening to sew some hexies together! Progress, yay!


The other little project is some cathedral windows that I am sewing by hand. I started these nearly 5 years ago! And I haven't got all that far yet! I clearly don't favour hand sewing over machine sewing!! 

So I have lots of these little squares that are ready to be turned into cathedral windows, as this picture shows!


So for this month's goal I would like to finish sewing together all my hexies into a mini quilt top. That is going to require me making a decision on a design though!!


Sunday, 15 September 2013

Star Surround Finish

I did it! Yay! My Star Surround quilt top is quilted. And in time for the parade over at Happy Quilting!

This started out as a set of 13 strips of Heaven and Helsinki fabrics, 5" wide by WOF. I won them in a competition held over at Mad About Patchwork sometime last year. It was a bit tight cutting out the squares using these as they were 1/4" too narrow. But I made it work with some fudging clever stitching.

I did some simple straight line quilting on this one to highlight the points of the stars.


Star Surround Front
I tend to prefer a more heavily quilted look. And I have been debating whether I should add some more quilting, but am undecided! The back shows the quilting a bit more clearly. I had enough scraps to make the scrappy binding and used the remaining fabrics on the back.


Star Surround Back
This marks the end of another quilt-a-long run by Melissa at Happy Quilting. She is holding a grand parade of all the finished quilts on Monday 16th September so hop on over and check them out, there will be some amazing quilts!

Quilt Stats:
Fabric: Heaven and Helsinki, Kona Snow
Size: 35.5" x 51" (rather an odd finished size!)
Started: August 2013
Finished: September 2013


Linking up with 


Saturday, 14 September 2013

More Letters

We are in month three of the Easy as ABC QAL over at Blossom Heart Quilts and the letters she published were KLMNO. I kind of wish I was making the quilt as it looks so great.

But no, I am making name banners for my 3 children. So I am picking and choosing the letters I make.

I started with the boy's name. I have just redecorated his room and made curtains and a headboard in a green, yellow and blue striped fabric. 


So I pulled out some fabrics that I though went with these and ended up with these four letters. Just need a couple of letters from further down the alphabet and he will be done.


The littlest one is very pink and very girlie so it was easy pulling fabrics for her letters. 


I never realised there were so many Ls in my children's names.

Linking up to

Friday, 6 September 2013

A Lovely Year of Finishes - Sept Goal

September! The start of a new school year and the littlest one has started Kindergarten! It's going to get very quiet around here! I haven't quite decided if that is a good thing or not. I do, however, have an ever increasing list of things that I should now be able to get done given there are no small people around!! But before that list can be tackled we have to get passed the 'gradual entry' phase, so far the school day has only been 2 hours long!


So, I have been busy finishing off my Star Surround quilt top. The deadline for this step is the middle of the month, so I have managed to meet that bit! Yay. 

I decided I had enough fabric to make another 2 blocks. It would have been nice to have had a little bit more fabric to make another column, but I was scrimping on the fabrics as it was! So I have the 16" blocks in a 2 x 3 layout.


The top has been on my design wall for a few days while I contemplated whether it should have a border or not. I didn't really want too much more white space but didn't have enough of the Kona tangerine (to match the outer triangles) to bind it with. So in the end I decided to add a small border so that I can do a scrappy binding.

I am currently piecing together all the leftovers to make the backing and then I can layer it and start quilting. Ha, and there is another decision to make!

Melissa is having a grand parade on September 16th for all those that get it quilted by then! There have been some great looking quilt tops! It should be a fun parade.


Whilst the quilt top sat on the design wall I managed to complete another Dr Who block. I am so far behind on these! Anyway, I give you the sonic screwdriver.


Sonic screwdriver

So, my primary goal for this month is to quilt and bind the Star Surround quilt top ready for the parade! 

If I meet this goal, I should then have the rest of the month to crack on with some Mario blocks (I have 3 left to do) and maybe another Doctor Who block, before the next 2 are revealed!


Saturday, 31 August 2013

A Lovely Year of Finishes - August goal Met!

Well, for the first time in a few months I actually completed my goal this month! That's not to say in the last couple of months I haven't completed anything, just not the one thing I set out to do! 

So my charm pack challenge mentioned here and here, has been on going for a while now. The top was finished quite quickly but then my chosen quilting pattern caused me to avoid it for a while.  It wasn't a particularly tricky pattern, I just got fed up turning the quilt every 10" when doing the straight lines. Plus my lines were not always very straight, despite using my walking foot guide, or equally spaced, especially after stopping for a coloured block.

Anyway, it's done! The kids were out today so I got to finish hand sewing the binding this afternoon sitting in the garden in the sunshine, which has returned after an amazing storm a couple of nights ago. A very pleasant way to spend a couple of hours!

So here is the finished quilt. Although the quilting was not the most enjoyable I have ever done, I really like how it has turned out. 


Sticky Notes - Front

I have also thought of a name for it! My husband seems to have lots of those sticky note pads and he stacks them up in piles on his desk, and several other places around the house! 


Some are square and some are rectangular, and so many colours. Looking at these one day I thought my pattern reminded my of sticky notes stacked in piles. And given that the fabric range is noteworthy, I am calling it Sticky Notes. Also quite apt since I did get a bit stuck on the quilting of it! 

So here are some more pictures of Sticky Notes.


Sticky Notes - Back


Quilt Stats:
Fabric : Noteworthy charm pack, Know Snow, Kona Ash (I think)
Size: 43" x 48"
Started: May 2013
Finished: August 2013


Linking up with