Wednesday 31 December 2014

A Lovely Year of Finishes 2015

I am going to join Sew Bittersweet Designs and Fiber of All Sorts again this coming year and see if I can complete some long overdue projects! 

Sewing took a backseat these past few months due to going back to college but I am hoping now I am in the swing of study again (ha!) I might be able to do both! Time will tell!

Check it out here! I grabbed their button!


A lovely year of finishes

Monday 29 December 2014

It's been a while!

It has been a while since I blogged! I went back to college in September and it took over all my spare time, so very little sewing happened until term ended at the beginning of December! I then set to making some Christmas gifts! 

First off, I caught up on some blocks for the moderninstabee, two Ziggy Stardust blocks:


Some oven gloves for my daughter who loves to cook!


Some fun scarves for friends and our kids.


Some knitted hats:


Late on Christmas Eve I eventually finished this Doctor Who Dalek cushion for my hubbie. The pattern was not easy but so pleased I persevered with it and I am really pleased with how it turned out! The pattern is by Soma at Whims and Fancies.


There are a few things that I haven't taken pictures of too. But now I put it all in one place I realize I was quite productive! :)

Thursday 21 August 2014

Small design board!

I have a design wall but more often than not it is full! How dare it! Or sometimes I am working on a smaller project and it would be good not to lose the positioning when I move it to the sewing machine. Because without a doubt I drop a piece or transpose a couple!

So when I saw this tutorial by Lori Holt to make a small portable design board I couldn't resist making one! This tutorial is not new so how come it took me so long to find it!! 

I got a foam board from the dollar store, found a piece of scrap wadding and a couple of jelly roll strips for the pretty binding. Within an hour I had a 20" square portable design board.


The tutorial is great and they are so simple to make. I got a bit carried away with the glue gun so I have some splodgy messes on the back, but hey, who is going to see those! 

I made the large size first as I was about to make some large blocks, but now I am thinking I might need a smaller one too! And here is my first block on the board. It will be 16.5" when all sewn together so my board sizing was ideal.


Tuesday 12 August 2014

Flowering Lonestar Pattern Giveaway!

Last week I posted about a quilt pattern I had been testing for Melissa at Sew BitterSweet DesignsThe post went up whilst I was away from home and I didn't know at the time of writing that I would be lucky enough to be able to give away a copy of the pattern.

Melissa launched the new patterns on Monday, you can read about it here, and see a variety of stunning quilts made using her pattern. It's quite amazing how a change of fabric or colour alters the pattern There are endless possibilities with this pattern.

This is Melissa's Flowering Lonestar. I love the bright fabrics against the grey background and her quilting is just stunning. 


If only I had picked a simpler quilting style I might be able to show a finished quilt but I am still quilting it! So here's some pictures of the quilting so far.


Pictures of the quilting on the Flowering Lonestar

The giveaway: CLOSED NOW

To win a copy of the flowering Lonestar pattern just leave a comment, anything you like.

And Sew Bittersweet Designs followers get a second entry, leave a comment letting me know how you follow Melissa.

If you'd like to follow me too, comment here how you do and you'll get a third entry.

The giveaway is open to anyone since it's a pdf pattern, good luck. Please make sure there's some way I can contact you, in case you win. I'll draw a random winner next Wednesday, August 20.


Linking up with:

WIP Wednesday at Freshly Pieced  

Monday 4 August 2014

Flowering Lone Star

** Update: I was away when this was post published and didn't know that Melissa was so kindly allowing me to giveaway a copy of the pattern. Come back later in the week for a chance to win! **

I have followed Melissa at Sew BitterSweet Designs since taking part in the Lovely Year of Finishes last year. She put out a call for some pattern testers a little while back and the pattern was a lone star. I love stars. So I just had to give it a go.

The last time I did a Lone star pattern it involved several tiny ones (6" stars) encompassing a slightly larger one, and it was foundation pieced (picture here). This time the lone star measures almost 50" and is just pieced!

It didn't take me too long to decide on the fabrics, these just sort of jumped out at me! Some bright,  yummy Kona solids.


The pattern was well written and really easy to follow. The hardest part of it was cutting all the pieces. The fun bit was then to decide on the actual layout. I arranged the pieces in different ways, consulted with my kids but when I didn't like their choice (the top left pic) it confirmed the layout I wanted to go with.


The final star looked like this:


The next step were the y-seams. I am not a fan of y-seams. The pattern explained well how to do it and they worked, with a lot of starch and a heavy iron! I just didn't like doing it! 

Flowering Lone Star
I knew I didn't want to do any more y-seams so to avoid that I pieced some stars using HST instead using all the colours from the front. I placed the stars in the corners so they would be in the white space on the front to help determine my quilting pattern. 

Back of the Flowering Lone Star

Basted and ready to quilt. I struggled with how to quilt this. I attempted a variety of ideas but was stomped because wanted to match the thread to the front and also to the back. I read a lot of well known FMQ blogs and books and most will say they use the same thread top and bobbin. But I didn't want to do this and it gave me a lot of grief. I eventually got the tension right which meant that my dark top thread doesn't show (too much) on the light backing fabric. If you look too closely little dots can be seen on the back, but I can live with that. 

So to start with I did some simple straight line quilting on the large lone star. I haven't yet decided if I am going to do some more quilting on the star or leave it as it is.


I am quite heavily free motion quilting in the white space corners. I outlined the star from the back and then pebbled out from the star points. I have then done a maze filler pattern in the remaining area.


I am happily quilting but it's taking me much longer than I thought it would, as these things often do. 

Melissa is launching her pattern today and I had hoped I would have finished the quilting to show off her great pattern. But sadly it is not finished. So here is my quilt as it stands at the moment.


Back


Friday 11 July 2014

A couple of finishes

I have been busy sewing lately and not so busy blogging. I blame this on Instagram! If you follow on me Instagram you might have seen these pictures before. 

I spent the morning at YVR airport with my eldest daughter who is travelling alone to the UK for the summer. Many mixed feelings on this, but since I was sat  waiting for the plane to leave the ground I decided to do some catch up!

Yesterday when packing she was going to stuff a handful of friendship strings and bits into her carry on bag! I could see the problem with this, whilst she was blissful unaware of the mess she would have a couple of hours into her flight! So last night I whipped up a mini drawstring bag for her using the tutorial by In Color Order. This is a great tutorial so quick and simple! 


Mini lined drawstring bag

I also made her a summer top using some fabric she had seen in the shop a while back. I hope it's sunny and warm in the UK at the moment!! This is based on a top that Old Navy had but not in the colour she wanted. Shearing the top aside, this was a quick top to make!
  
Summer top

The youngest daughter has been doing a dance camp this week. Singing and dancing to everything Frozen. She has had a great time, as would any 5 year old girl I'm sure. So last weekend I played with sequins, satin and netting! Yuck! The outcome though was this Queen Elsa dress that she loves. 

The Front
The Back

Full on action shot

Had my fill of clothes making now. Back to the quilting :)

Linking up with Crazy Mom Quilts.

Monday 23 June 2014

Super Mario {Finish}

It's finally finished!! I am so pleased to tick this one off the list at last.
Finished Mario Quilt

If you have been following me a while you'll have seen my progress on this mammoth quilt! There are pictures on flickr here and some old posts here, here and here.

I started this quilt in Feb 2013. I found the QAL run by Cut to Pieces a while after it had ended but my son (and husband!) is such a Mario fan I couldn't resist. I had envisioned it being a birthday present for him. His birthday being May gave me 3 months!

I didn't have the Pellon stabilizer that she recommended so decided I could just sew them together! The one thing that I hadn't really thought through was the amount of time it was going to take to cut and sew together all those 1 inch squares! Some 3888 squares to be precise! It was certainly a challenge, and it became evident quite early on that it was going to take longer than 3 months to complete!! So I shifted the goalpost to a Christmas gift!

I found I could focus on doing blocks for a while but would then have to stop and do something else until the pain had worn off and I could face it again. Eventually I had all 12 blocks complete. 


It was at this point that I discovered that my blocks were not all 18.5" square! Some were close to the same size but there was nearly 0.75" difference between the largest and smallest blocks! So adding the sashing proved to be quite an issue. A lot of manipulation went on until it was all attached! It was now 3 weeks before Christmas.

The backing had to pieced since I certainly didn't have a piece of fabric big enough for this huge quilt. I decided to stick with a pixel theme and some pieced letters. Despite going with a relatively simple idea, it took longer than expected to piece it together, this might have had something to do with the busy time of year too! I had now abandoned the idea of it being a Christmas gift!


By the beginning of January 2014 it was finished to the point of basted and ready for quilting. And there is sat, again.


I eventually got brave enough to start quilting it about a week before his birthday! The quilt was so heavy and large I knew the quilting had to be kept fairly simple so I decided to go with stippling like the pillow I had already made for him. With the blocks being 18" square (roughly!) it was taking me just over an hour a block! 


I spent every evening quilting late into the night. His birthday arrived and I conceded to give it to him with a 6" strip at the bottom of the quilt that was not quilted! It was finished the following day whilst he was at school. I bound it using Kona charcoal. 


Quilt Front


Quilt back

He was very pleased when it was finally on his bed! 


I am now about to package it up though and send it to the UK with my daughter as I have entered it into the Festival of Quilts in Birmingham in August 2014! This will be the first quilt I have ever entered to be displayed anywhere! My mum has entered one of her quilts too! I wish I could be there to see them hanging, instead I am hoping my mum and daughter get a good picture of them when they are there! 

Quilt Stats:
Pattern (front): Mario QAL with
Cut to Pieces
Quilt Stats:
Pattern (back): My own design using some letters by Blossom Heart Quilts
Fabrics: Variety of Kona solids
Quilted: by me using Aurifil 50 weight Silver Fox
Started: Feb 2013
Finished: May 2014
Size: BIG! : 87" x 67"

Friday 6 June 2014

Boxy Pouch {Finish}

I made a boxy pouch! I usually avoid zippers as I think they will be tricky. But I have a need for a pouch so thought I would give it a go.

I found a tutorial for a boxy pouch here by Pink Stitches.

I want to use the pouch for toiletries so decided to use some of the babyville boutique PUL fabric I have had sitting around for a while. This was probably not the best fabric to choose for the first try at the pouch! But hey, I like a challenge. 

I managed to do it, with quite a large amount of unpicking and fiddling! The PUL fabric moves too much when sewing. But at least that's hidden on the inside. 

Boxy Pouch
I practiced some FMQ on the outside. I did loops and hearts to make the stripes a little more feminine than their are. This is a pouch for my big girl who is doing some travelling on her own this summer. She likes blue so hopefully this will appeal to her.

I might have to try another one of these pouches but with some more forgiving interior fabrics!

Happy sewing. 

Friday 30 May 2014

Mini Swoon ** Finish **

I have seen so many lovely pictures of Thimble Blossoms Swoon quilt pattern that I just had to make one. But I really didn't want to commit to another big quilt just yet! So the mini swoon seemed ideal!

Swoon blocks


I found an online shop that had some Scrumptious fabrics available still and just knew that's what I wanted. The blocks finish at 8" which is a super cute size. 


They can be a bit tricky getting the points to line up perfectly (and I do like perfection!) but I conceded in the end to stop unpicking and live with them as close as they were. I was enjoying making these blocks and had plenty of fabric to make some more. 

After finishing the 5th block I remembered why I had started making the mini version of this quilt. I didn't want another big project on the go when I was supposed to be finishing the Mario quilt! This was supposed to be a quick fix project! Not like me to get carried away!! Hehe!

So I stuck with the pattern and used the four blocks I liked the most and constructed the top.


I had some small scraps of fabric left over from making the front so I pieced them together to make a strip. I added some Kona pond that matched the scrumptious aqua really nicely to make the back the right size. I forgot to take a picture of the back before quilting it. But here it is quilted.

Mini swoon quilt back

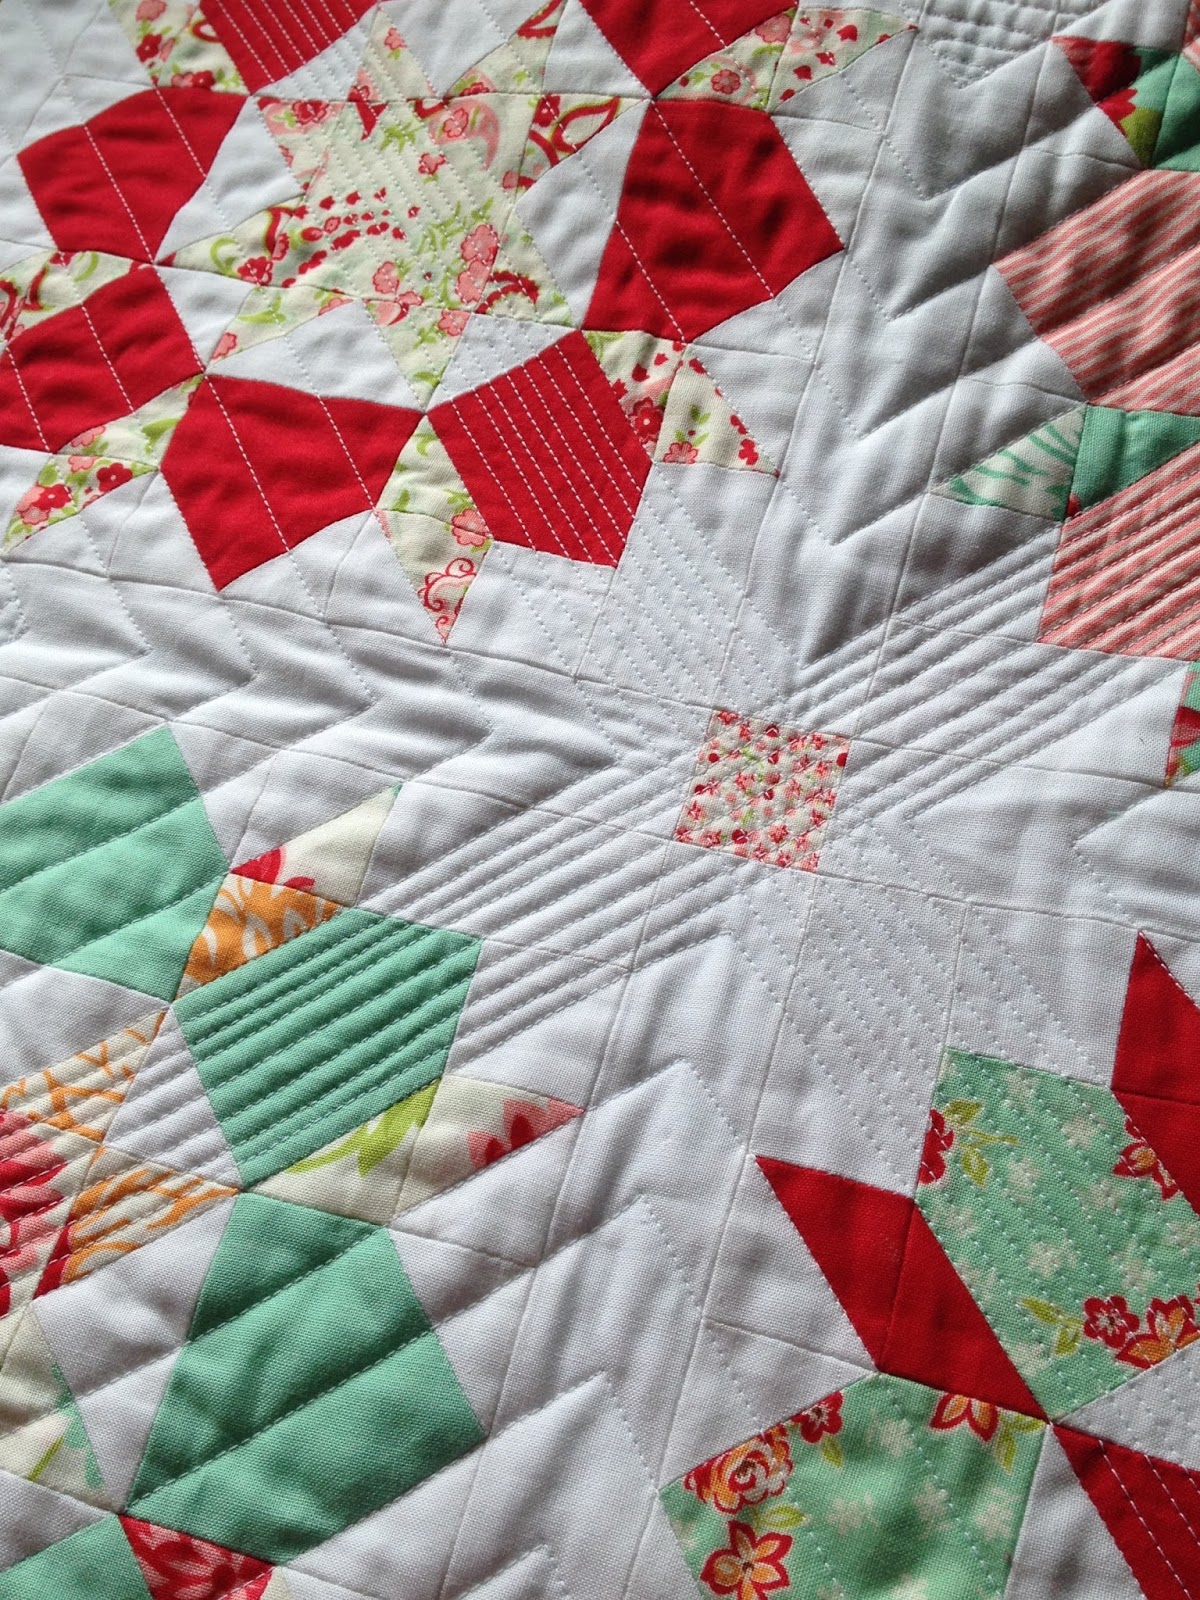
I went with straight line quilting on the diagonal about 0.75" apart. Having done those I decided to do some narrower lines but only in a small section. I need to practice straight-line quilting, my lines are not always very straight or evenly spaced! But I like it!


Finally, I put on my free motion foot and did some freehand straight-lines in the triangles that had formed on the edges.


And here finally, the finished quilt.
Mini Swoon Quilt front

Making all the triangles in these blocks creates a lot of tiny scrap triangles. I am not very good at throwing fabric away but I am seriously wondering if it is worth keeping these tiny bits! Perhaps I'll put them in a tub for now and see!


Quilt Stats:
Pattern: Thimble blossoms Mini Swoon
Size: 19" x 19" 
Fabrics: Kona white, Kona pond, selection of Moda Scrumptious
Stared: April 2014
Finished: May 2014


Friday 16 May 2014

Bloggers Quilt Festival Spring 2014

It's the Bloggers Quilt Festival again. Welcome, new and old viewers. 

I have just finished a small wall hanging for my son whose birthday it is very soon. I am still trying to finish quilting his bed quilt, so I can't enter that one this time!! The Boy is very much into Pokemon at the moment. I am amazed that this craze is still going around! I decided to make him something small to hang on the wall beside his bed.

I found a paper pieced pattern of Pikachu at Fandom In Stitches which came together relatively easily. 


Although, I had just taken a picture of the finished block when I noticed I had used the wrong colour in a place that mattered and gave poor Pikachu an extra pointy face. 


I couldn't live with this so it was soon corrected!

Paper Pieced Pikachu

I appliquéd the Pokemon title on to the top border and topstitched it down too, just in case it gets pulled around. I also appliquéd 3 pokeballs along the bottom. A pokeball is (I believe) the place you store your Pokemon (pocket monster, for those not in the know!). The 3 pokeballs I used were the poke ball, the friend ball and the premier ball.


He needed some features adding, like maybe some arms and a nose and mouth.   I also outlined him in black to give him more definition. I enjoyed this bit, like finishing off the character.


The rest of it is quite simply quilted with a little bit of echo quilting around the features and then lightning strikes down the side borders because he is an electric-type Pokemon and can store electricity in his cheeks and release it in lightning-based attacks, apparently! This is about as much as I know, and want to know, about Pokemon. Although, I am currently planning a Pokemon party for the birthday boy so I might have to gain a bit more knowledge to keep up with the 8 year old boys.

Here is the final wall hanging. Hoping it goes down well with the birthday boy.

Final Pikachu wall hanging

There will be lots of great quilts on display in the Blogger's Quilt Festival over at Amy's Creative Side so do go take a look at them.

Spring '14 Blogger's Quilt Festival - AmysCreativeSide.com

Quilt Stats:
Fabric: A variety of Kona solids
Size: 17.5" x 13.75" (? oh well!)
Started: 6 May 2014
Finished: 12 May 2014